 
|
WORLD WIDE WEB HOSTING |
 |
 |
 |
|---|---|---|
 |
 |
 |
Online Manual
|
|
WORLD WIDE WEB HOSTING |
|
|
|
|---|---|---|
|
|
|
Online Manual
CGI stands for "Common Gateway Inferface," a fancy name meaning computer programs running on the webserver that can be invoked from a www page at the browser. The "bin" part alludes to the binary executables that result from compiled or assembled programs. It is a bit misleading because cgi's can also be Unix shell scripts or interpreted languages like Perl. CGI scripts need to be saved in ASCII format and uploaded to your server's cgi-bin in ASCII or text format. This is very important.
We don't provide free support for CGI scripts
which we did not install on your server. So if you are not already familiar
with CGI scripting, you may want to read a book on the subject or find places
on the Internet with CGI scripting information. There are many good resources
for CGI scripts found on the web. The scripts at Matt's Script Archive
found at http://www.worldwidemart.com/scripts/ are very good. Many of our
scripts come from here. Another excellent resource is The CGI Resource
Index found at http://www.cgi-perl.com/ -- if you are not an expert,
look for scripts that are very well documented and come with step-by-step
instructions, or contact us for help or installation.
Put your cgi-bin scripts in the www subdirectory named "cgi-bin".
Paths to Date, Mail, Perl, etc.
Here are your paths to the common server resources that CGI scripts often require:
| Sendmail: | /usr/sbin/sendmail |
| Perl5.003: | /usr/bin/perl |
| Perl5.004: | /usr/bin/perl5.004 (Full 5.004 lib support not available as of 12/98) |
| Date: | /bin/date |
| Java: | /usr/bin/java |
| Python: | /usr/bin/python |
| Domain path: | /www/yourdomain (puts you in your web directory) |
| Cgi-bin path: | /www/yourdomain/cgi-bin (puts you in your cgi-bin) |
The following is a simple explanation of file permissions in Unix. To list the access permissions of a file or directory, telnet to your server, then:
cd directoryname
to change the directory until you are either in the directory above the file you are interested in, or above the directory you are checking.
Type: ls -l filename
and you will see what the current permission settings are for that file, along with a bunch of other stuff.
Examples of using chmod:
| PEOPLE | PERMISSIONS |
| u = the file's user (you) | r = read access |
| g = the file's group | x = execute access |
| o = others | w = write access |
| a = the user, the group, and others |
To change permissions for a file named filename.cgi, you need to chmod the file (change mode). For example, when you type this:
chmod u=rwx,g=rx,o=rx filename.cgi
you've given:
read, execute, and write access to the user (that's
you)
read and execute access to the group and
read and execute access to others
Some scripts will tell you to chmod 775 (for example). Doing the above is the same thing as typing chmod 775. You can use either method with our Unix servers. Let me explain:
When using the numeric system, the code for permissions is as follows:
r = 4 w = 2 x = 1 rwx = 7
The first 7 of our chmod775 tells Unix to change
the user's permissions to rxw (because r=4 + w=2 + x=1 adds up to 7. The
second 7 applies to the group, and the last number 5, refers to others (4+1=5).
When doing an ls -l on the file, telnet always shows the permissions this way:
-rwxr-xr-x
Ignore the first dash, then break up the above into three groups of letters. If there's a dash where a letter should be, it means that there is no permission for those people.
Remember: the first 3 apply to user, the second 3 apply to group, and the third 3 apply to others.
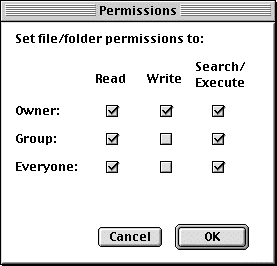
Some FTP clients support changing permissions
in a more graphical way. If you have Fetch for the Mac, you have an easy
way to change permissions. Go to the file you want to change the permissions
on, and highlight it. Under the Remote menu, select Change Permissions.
A window will pop up showing the current permissions for the file you had
highlighted, as in Figure 3A below. Click on the boxes to change
permissions as needed.
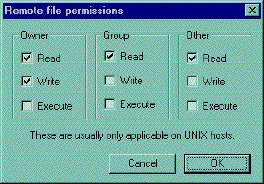
WS_FTP accomplishes the same task as above.
Just highlight the file you want to check, and right-click on it. A menu
will pop up, then select CHMOD. You will see the window below, as in Figure
3B.
Troubleshooting
CGI-bin Problems
Below are solutions to some of the more common
CGI script problems, in question and answer format. You will find a list of
proper permission settings for the scripts we provide at the end.
When I activate my CGI program, I get
back a page that says "Internal Server Error. The server encountered
an internal error or misconfiguration and was unable to complete your request."
This is generally caused by a problem within
the script. Log in via Telnet and test your script in local mode to get
a better idea of what the problem is. To do this, go into the directory
in which your script is located, then execute the script. To execute the
script, you can do it by two ways:
1) Type "perl -c myscript.pl" (-c tells Perl to check the syntax only).
2) Or simply type "myscript.pl" alone,
that will work if the first line is well written to indicate the location
of Perl.
The first one is useful to see if there's any
error IN your script. The second one is useful to test if your "calling
line" (the first line of the script) is okay, i.e. if you entered the
right location of Perl.
I am being told "File Not Found,"
or "No Such File or Directory."
Upload your Perl or CGI script in ASCII mode,
not binary mode, unless you are using an Amiga or Unix computer.
When I test my Perl script in local mode
(by Telnet), I have the following error: "Literal @domain now requires
backslash at myscript.pl line 3, within string. Execution of myscript.pl
aborted due to compilation errors."
This is caused by a misinterpretation by Perl.
You see, the "@" sign has a special meaning in Perl; it identifies
an array (a table of elements). Since it cannot find the array named domain,
it generates an error. You should place a backslash (\) before the "@"
symbol to tell Perl to see it as a regular symbol, as in an email address.
I am getting the message "POST not
implemented."
You are probably using the wrong reference
for cgiemail. Use the reference /cgi-bin/cgiemail/mail.txt. Another possibility
is that you are pointing to a cgi-bin script that you have not put in your
cgi-bin directory. In general, this message really means that the web server
is not recognizing the cgi-bin script you are calling as a program. It thinks
it is a regular text file.
It's saying I don't have permission to
access /
This error message means that you are missing your index.htm file. Note that files that start with a "." are hidden files. To see them, type ls -al. If you wish to FTP this file in, go to the home/yourdomain directory.
Permission Settings for the scripts provided
| Normal Site | Frontpage Site | |
| wwwboard | ||
|---|---|---|
| bbs dir | chmod 777 | chmod 777 |
| bbs/messages | chmod 777 | chmod 777 |
| bbs/index.sht | chmod 666 | chmod 666 |
| bbs/data | chmod 666 | chmod 666 |
| cgi-bin/wwwboard.pl | chmod 755 | chmod 755 |
| Guestbook | ||
| Guestbook dir | chmod 755 | chmod 777 |
| Guestbook/guestbook.cgi | chmod 755 | chmod 755 |
| Guestbook/guestbook.setup | chmod 666 | chmod 666 |
| Guestbook/guestbook.html | chmod 666 | chmod 666 |
| Free for all Links | ||
| links dir | chmod 755 | chmod 777 |
| links/links.htm | chmod 666 | chmod 666 |
| cgi-bin/links.pl | chmod 755 | chmod 755 |
| Graphic Counter | ||
| counter dir | chmod 775 | chmod 777 |
| counter/logs | chmod 777 | chmod 777 |
| counter/ all other files | chmod 666 | chmod 666 |
| cgi-bin/counter | chmod 755 | chmod 755 |
| Cgi-bin always chmod 755 all scripts chmod 755 in main bin | ||
| cgi-bin/counters (text counter) | chmod 755 | chmod 777 |
| Random Text | ||
| random dir | chmod 775 | chmod 777 |
| random/random.txt | chmod 666 | chmod 666 |
| Password Admin | ||
| password dir | chmod 755 | chmod 777 |
| All password files | chmod 666 | chmod 666 |
Cgiwrap--Secure Server CGI Wrapper
We now have a cgi wrapper for the secure server called cgiwrap. We have configured it to be automatically invoked when you make a call containing "cgi-domain", like this:
https://machine.safe-order.net/cgi-domain/script.cgi
You can call cgiwrap explicitly with this call, which does the same thing as the above call:
https://machine.safe-order.net/cgi-bin/cgiwrap/domain/script.cgi
This assumes script.cgi is in your cgi-bin. You can also use cgiwrapd in place of cgiwrap to get extra debugging information if there is a problem. For nph-style scripts, use nph-cgiwrap or nph-cgiwrapd instead.
The script is one from Matt's Script Archive
which we have installed and preconfigured for your domain. FormMail is a
generic www form to e-mail gateway, which will parse the results of any
form and send them to the specified user. This script has many formatting
and operational options, most of which can be specified through the form,
meaning you don't need any programming knowledge or multiple scripts for
multiple forms. This also makes FormMail the perfect system-wise solution
for allowing users form-based user feedback capabilities without the risks
of allowing freedom of CGI access.
There is only one form field that you must
have in your form, for FormMail to work correctly. This is the recipient
field. Other hidden configuration fields can also be used to enhance the
operation of FormMail on your site. The action of your form needs to point
towards this script (obviously), and the method must be POST in capital
letters.
Here's an example of the form fields to put
in your form:
<FORM METHOD=POST ACTION="http://yourdomain.com/cgi-bin/formmail.cgi">
<input type=hidden name="recipient"
value="whoever@yourdomain.com">
<input type=hidden name="subject"
value="Order">
<input type=hidden name="return_link_url"
value="http://yourdomain.com/">
<input type=hidden name="return_link_title"
value="Back to Main Page">
The following are descriptions and proper syntax
for fields you can use with FormMail.
Recipient Field
Description: This form field allows you to specify to whom you wish for your form results to be mailed. Most likely you will want to configure this option as a hidden form field with a value equal to that of your email address.
Syntax:
<input type=hidden name="recipient"
value="email@yourdomain.com">
Subject Field
Description: The subject field will allow you to specify the subject that you wish to appear in the email that is sent to you after this form has been filled out. If you do not have this option turned on, then the script will default to a message subject: "WWW Form Submission".
Syntax: If you wish to choose what the subject is:
<input type=hidden name="subject" value="Your Subject">
To allow the user to choose a subject:
<input type=text name="subject">
Email Field
Description:
This form field will allow the user to specify their return email address.
If you want to be able to return e-mail to your user, I strongly suggest
that you include this form field and allow them to fill it in. This will
be put into the From: field of the message you receive. If you want to require
an email address with valid syntax, add this field name to the 'required'
field.
Syntax:
<input type=text name="email">
Realname Field
Description:
The realname form field will allow the user to input their real name. This
field is useful for identification purposes and will also be put into the
From: line of your message header.
Syntax:
<input type=text name="realname">
Redirect Field
Description:
If you wish to redirect the user to a different URL, rather than having
them see the default response to the fill-out form, you can use this hidden
variable to send them to a pre-made HTML page.
Syntax:
To choose the URL they will end up at:
<input type=hidden name="redirect" value="http://yourdomain.com/to/file.html">
To allow them to specify a URL they wish to
travel to once the form is filled out:
<input
type=text name="redirect">
Required Field
Description:
You can require certain fields in your form to be filled in before the user
can successfully submit the form. Simply place all field names that you
want to be mandatory into this field, separated by commas. If the required
fields are not filled in, the user will be notified of what they need to
fill in, and a link back to the form they just submitted will be provided.
To use a customized error page, see 'missing_fields_redirect'
Syntax: If you want to require that they fill in the email and phone fields in your form, so that you can reach them once you have received the mail, use the syntax like:
<input
type=hidden name="required" value="email,phone">
Env_report Field
Description: Allows you to have Environment variables included in the email message you receive after a user has filled out your form. Useful if you wish to know what browser they were using, what domain they were coming from or any other attributes associated with environment variables. The following is a short list of valid environment variables that might be useful:
REMOTE_HOST - Sends the hostname making the
request.
REMOTE_ADDR - Sends the IP address of the remote
host.
HTTP_USER_AGENT - The browser the client is using.
(Note: In our case, both REMOTE_HOST and REMOTE_ADDR
are the same, since our servers don't do the reverse DNS lookup needed to
generate the true REMOTE_HOST string).
Syntax: If you wanted to find all the above variables, you would put the following into your form:
<input type=hidden name="env_report" value="REMOTE_HOST,REMOTE_ADDR,HTTP_USER_AGENT">
Sort Field
Description:
This field allows you to choose the order in which you wish for your variables
to appear in the email form that FormMail generates. You can choose to have
the field sorted alphabetically or specify a set order in which you want
the fields to appear in your mail message. By leaving this field out, the
order will simply default to the order in which the browsers send the information
to the script (which is usually the exact same order as they appeared in
the form). When sorting by a set order of fields, you should include the
phrase "order:" as the first part of your value for the sort field,
and then follow that with the field names you want to be listed in the email
message, separated by commas.
Syntax: To sort alphabetically:
<input
type=hidden name="sort" value="alphabetic">
To sort by a set field order:
<input
type=hidden name="sort" value="order:name1,name2,etc...">
Print_config Field
Description:
print_config allows you to specify which of the config variables you would
like to have printed in your e-mail message. By default, no config fields
are printed to your email. This is because the important form fields, like
email, subject, etc. are included in the header of the message. However
some users have asked for this option so they can have these fields printed
in the body of the message. The config fields that you wish to have printed
should be in the value attribute of your input tag separated by commas.
Syntax:
If you want to print the email and subject fields in the body of your message,
you would place the following form tag:
<input
type=hidden name="print config" value="email, subject">
Print_blank_fields Field
Description: print_blank_fields allows you to request that all form fields are printed in the return HTML, regardless of whether or not they were filled in. FormMail defaults to turning this off, so that unused form fields aren't emailed.
Syntax:
<input type=hidden name="print_blank_fields"
value="1">
Title Field
Description:
This form field allows you to specify the title and header that will appear
on the resulting page if you do not specify a redirect URL.
Syntax:
If you wanted a title of 'Feedback Form Results':
<input
type=hidden name="title" value="Feedback Form Results">
Return_link_url Field
Description:
This field allows you to specify a URL that will appear, as return_link_title,
on the following report page. This field will not be used if you have the
redirect field set, but it is useful if you allow the user to receive the
report on the following page, but want to offer them a way to get back to
your main page.
Syntax:
<input type=hidden name="return_link_url"
value="http://yourdomain.com/index.htm">
Return_link_title
Description: This is the title that will be used to link the user back to the page you specify with return_link_url. The two fields will be shown on the resulting form page as:
Back to Main Page
Syntax:
<input type=hidden name="return_link_title"
value="Back to Main Page">
Cgiemail is another form processing script,
totally different than FormMail, discussed above. It is a program written
in the C language that takes the contents of fill-in boxes on a form and
emails them to a specified location. In addition to the form specification
in the .html file, a mail specification in a .txt file is required to format
the resulting email message.
We provide the cgiemail in the cgi-bin directory
of your server. You need to have an action in your order.htm file to call
it. It should look like this:
<form method=post action="http://www.yourdomain.com/cgi-bin/cgiemail/order.txt">
Details are provided below. While there are a number of subsections below this one, they all work together and are meant to be read from start to finish.
order.htm
Look for a file in your www directory called
order.htm. This is our example form we put on your site that shows how a
form should be configured to work with Cgiemail. Look at it in a browser,
and download it to your hard drive using FTP so you can see how it works.
If you've never dealt with HTML forms before, don't worry, they're easy
to create and understand.
The form prompts the user for data which is
sent to the server as simple key-value pairs. Each <input> tag specifies
a record. The key is given by the name attribute, and the value is
given by the value attribute. The type attribute tells the
browser what kind of data to expect. Now, try looking at the example.
Please note that the hidden items are used
to transmit critical info to Cgiemail. They provide the location of the
success file, the name of the person the results should be sent to, and
the subject of the form. When making your own forms, you may want to change
the email address in the "required-to" field, and likely the subject
in the "subject" field. The first item tells Cgiemail what to
show the user after successfully completing the form. You can, but don't
need to customize this.
After that come the items that are actually
presented to the user. You'll want to use type=text input items with cgiemail:
it's a simple tool. The size=60 tells the browser how big to make the box.
The name=something is required in each input tag, otherwise the browser
wouldn't know how to send the data to the server. The value=" "
attribute is correct in most cases, unless you want a default value in the
form.
Note that if a field begins with required-,
cgiemail will require that the user enter a value for this field. This is
particularly useful if you want to require a user to submit their email
address.
When the user presses the Submit button, the
data goes to our machine where cgiemail starts doing something with it.
What is does is controlled by the order.txt file discussed below.
By the way, you can name your HTML form anything you want to.
order.txt
Now that we have all this data, what do we
do with it? Mail it, of course! But for flexibility, cgiemail requires that
you create a mail.txt file to show it what to send. (If you didn't want
flexibility you'd use a mailto link.) The program will read this file, perform
substitutions, and pass it to the mail system.
Make sure that you upload mail.txt in ASCII
mode. Failure to upload mail.txt in ASCII mode will generate the message:
"Server Error: The server encountered
an internal error or misconfiguration and was unable to complete your request."
There is already an example order.txt document
in the forms directory in your www directory.
By the way, there's nothing magical about the
name order.txt. Feel free to call it mail1.txt or form1.mail, or whatever
suits you, as long as the form has the correct name for what you uploaded.
Note that the first several lines are mail
headers. You probably shouldn't change that part, or the corresponding parts
in your form. In particular, there must be a To: header or the mail won't
go anywhere!
What cgiemail does is simply replace every
string that looks like [key] with the value the user typed into the field
with name=key. That's all. You can lay out your form as is best for your
users, but lay out your mail.txt as is best for you to read. You can even
insert gobs of text to help format the output. Only the [key] parts will
be replaced by cgiemail.
Cgiemail does not report environmental variables
like FormMail will, but other than that, it is an excellent program, allowing
you more flexibility in the way you want your data returned by the form.
Normally, any text (such as your credit card
number) sent from your browser to the web server is sent as plain text.
This means that a hacker could potentially intercept (however unlikely)
the information sent from your browser and read it. However, by using the
secure server, the information is encrypted before it is sent from your
browser. It would be practically impossible for anyone to decrypt it without
knowing the key. Please use the secure server only when necessary, as when
requesting sensitive information from your visitors.
The domains hosted by us are housed on any
number of computers and all of them have a different machine name. To find
out what machine name to use for your secure order access calls, go to your plusmail control panel and look on the box next to the quick stats or check the
faq file of your domain at:
http://www.yourdomain.com/faq.html
Each server has its own safe-order site, and
although you will be putting your form on your own domain, it must be called
through the safe-order server in order for the form to be secure.
To do this, create your form as usual and put
it somewhere in your www directory. You can put your form anywhere you want
to, but for this example, let's assume the normal URL for your form can
be accessed from a browser with this URL:
http://www.yourdomain.com/signup/secureform.html
To call the form through the secure-order server,
you need to use the following URL to access your pages via the secure server
(even though your form resides on your own domain space): https://machinename.safe-order.net/yourdomain/signup/secureform.html.
That would be the URL you would put as an <HREF>
to link to your form from whatever page you have your visitors link from.
Don't forget the "s" in "https."
To call scripts in your cgi-bin via the secure server you should use a URL like this:
https://machinename.safe-order.net/cgi-yourdomain/your-cgi.cgi
Special instructions for using FormMail.cgi
with the Secure Server
If you are using formmail.cgi through the secure
server, you can still place your form anywhere on your webspace you want
to, but you MUST use the following URL as the ACTION of your form: https://machinename.safe-order.net/cgi-bin/formmail.cgi
Here's an example of how the first parts of
your form might look:
<FORM METHOD=POST ACTION="https://machinename.safe-order.net/cgi-bin/formmail.cgi">
<input type=hidden name="recipient"
value="whoever@yourdomain.com">
<input type=hidden name="subject"
value="Order">
<input type=hidden name="return_link_url"
value="http://yourdomain.com/">
<input type=hidden name="return_link_title"
value="Back to Main Page">
It is still important that you call your order page through a secure URL in order to work properly. You must use: https://machinename.safe-order.net/yourdomain/order.htm. If you call formmail.cgi through the secure server, you must also call the order form through the secure server. Otherwise, a "bad referrer" message will result.
Guestbook allows you to set up your own comments
page. From there, visitors can add entries to your guestbook and they will
be displayed with the most recent at the top and scrolling down, or vice
versa. Other options include the ability to limit HTML in the entry, link
to e-mail address with mailto tag, use a log to log entries, redirect to
a different page after signing, emailing whenever a new entry is added,
and much more.
If Guestbook is already set up for use on your
server, you can simply use the following URL to access it: http://yourdomain.com/Guestbook/guestbook.html otherwise you can install the latest version from your control panel.
If you want to change any of the configuration
options, locate the guestbook.cgi file in your Guestbook directory (inside
your www directory). Download it to your hard drive in ASCII mode, and save
it somewhere safe. Create a copy of the file and give it the same name,
then edit the options as specified below. Keep your backup of the original
guestbook.cgi in case you run into problems.
Option 1: $mail
This option will allow you to be notified via
an E-mail address when a new entry arrives in your guestbook. The entry
will be mailed to you as a notification. If you should choose to turn this
variable on you will need to fill in the 2 variables that go along with
it:
$recipient - Your email address, so that the mailing program will know who to mail the entry to.
$mailprog - The location of your sendmail program
on your host machine.
Option 2: $uselog
This will allow you the ability to use the
short log feature. It is already turned on so you will have to change it
to 0 if you do not wish to use it. It has been implemented since there are
probably many people who feel no need to have a log when people are making
entries to a file anyway. Keep in mind that it will show errors which is
one nice aspect about it.
Option 3: $linkmail
Turning this option on will make the address
links in your guestbook become hyperlinked. So instead of simply having
(name@some.host) it will put (<a href="mailto:name@some.host">name@somehost</a>
so that anyone can simply click on the address to email them.
Option 4: $separator
This allows you to choose whether you want
guestbook entries to be separated by a Paragraph Separator <p>, or
a Horizontal Rule <hr>. By changing the 0 in the script to a 1, you
will turn on the <hr> separator and turn off the <p> separator.
The 0 option will do the reverse of that; turn on the <p> and turn
off the <hr>.
Option 5: $redirection
By choosing 1 you will enable auto redirection
and 0 will return a page to the user telling them their entry has been received
and click here to get back to the guestbook.
Option 6: $entry_order
Set this option to 0 and the newest entries will be added below the rest of the entries. Keep this option at 1 and the guestbook will add the newest entries at the top.
Option 7: $remote_mail
Many users of the guestbook have requested
that a form letter be automatically sent to the remote user when they fill
in the guestbook. Turning this option on will tell the script to automatically
mail any user who leaves an email address. You can specify the contents
of the mail message by editing the section of the script that sends mail
to the remote user. By default it sends a message that says, "Thank
you for adding to my guestbook." and then shows them their entry. If
you should choose to turn this variable on, you will need to fill in the
2 variables that go along with it:
$recipient - Your email address so that the mailing program will know who to mail the entry to.
$mailprog - The location of your sendmail program
on your host machine.
Option 8: $allow_html
This option allows you to turn on or off the
use of HTML tags by users of your guestbook. Setting this variable to 1
allows users to embed html tags such as <b> or <H1> or <a
href=" "></a> into your html document. Setting this variable
to 0 will not allow them to use any html syntax in their comments or any
other field. You can still link to their comments or any other field. You
can still link to their email address by turning $link_mail to 1.
There is also the ability for users to add
their own URL and then their name is referenced to their URL in the guestbook.html
file. This helps to eliminate the need for allow_html to be turned on, and
lets users point you to a spot that will tell you more about them. Several
users of the guestbook script have asked for this option. If you wish to
disable the option, simply delete the following line from your addguest.html
file:
URL: <input type=text name=url size=50><br>
These are the rest of the important guestbook
files found in your Guestbook directory:
guestbook.html
This is the file that you will link to that
will contain the Guestbook Entries. You may want to edit the title and heading
spaces and customize the look any way you desire. Do not delete the line
<!--begin-->
from this guestbook, or else the script will have no way of knowing where
to begin the editing. The <!--begin-->
line is the only necessary line in your guestbook.html file, but the link
to the addguest.html file is also a good idea. :-)
Free For All Link Page allows you to set up
a web page which your users can then add links to in specified categories.
Newest links are added to the top of each category. A running total of the
number of links present as well as the time when the last link was added
is shown at the top of the page. Your preconfigured Free For All Links page
is already set up on your server at http://www.yourdomain.com/links/links.htm.
The only configuration you may want to do is to customize the look of the
links.htm page. Just leave the method and input tags the way they are. If
you decide to change the category names, you must do so in the links.htm
document, AS WELL AS the links.pl file in your cgi-bin.
Should you find one day that your links page is growing at an alarming rate and is mostly filled with commercial ads such as:
--------------------- MAKE MONEY QUICK ------------------------
++++++++++++++ FREE STUFF - CLICK HERE +++++++++++++
It means that some unethical web promotion service has added a link to your page or .pl file in their robot configuration and automatically submits new links to your page without your consent. In this case, let us know immediately and we'll put an end to it. We can set a trap to trace and log any unauthorized use for evidence gathering, and depending on the extent of the abuse, you may be able to recover damages from the offender for using your bandwidth and time.
This script is preconfigured for your server.
There is a directory in your www directory called "random." Inside
that directory is a file called random.txt. Just download this file to your
hard drive and edit it with any random text you would like placed in an
html document. Remember to keep the %% separator between quotes. You can
use any html formatting tags you want to, including <href> tags so
you can configure it as a random link generator. You can put in as many
quotes as you wish. Upload the random.txt file to your server in the same
location you found it, remembering to upload it in ASCII or text mode.
The script uses SSI (Server Side Includes)
so the page you want to use random text on must have the .sht, .shtm, or
.shtml extension. On your page, just put this tag wherever you want the
random text to appear:
<!--#exec cgi="/cgi-bin/randomtext.cgi"-->
That's all there is to it!
WWW Board is a threaded World Wide Web discussion
forum and message board, which allows users to post new messages, follow-up
to existing ones and more. It is already preconfigured for your server.
Just go to http://www.yourdomain.com/bbs to post your messages there.
There are several options you may want to configure.
First of all, the index.sht file in the bbs directory can be customized
any way you wish as long as you leave the method and input tags the way
they are.
Additionally, here are some options contained
in the wwwboard.pl script itself (located in your cgi-bin directory) which
you may want to change, depending on your needs:
$show_faq = 1;
This option allows you to choose whether or
not you want to display a link to the FAQ on every individual message page
or not. It defaults to 1 and the link will be put in at the top of the message
along with links to Followups, Post Followup and Back to $title. Setting
this to 0 will turn it off, and keeping it at 1 will keep the link. You
need to create a faq.html file and put it inside the bbs directory. The
FAQ can contain any information you want to give your visitors about how
the board works, your organization, types of postings that will be allowed,
etc.
$allow_html = 1;
This option lets you choose whether or not
you want to allow HTML mark-up in your posts. If you do not want to allow
it, then everything that a user submits that has <>'s around it will
be cut out of the message. Setting this option to 1 will allow HTML in the
posts and you can turn this option off by setting it to 0.
$quote_text = 1;
By keeping this option set to 1, the previous
message will be quoted in the followup text input box. The quoted text will
have a ':' placed in front of it so you can distinguish what had been said
in the previous posts from what the current poster is trying to get across.
Setting this option to 0 will leave the followup text box empty for the
new poster.
$subject_line = 0;
There are three options for the way that you
can display the subject line for the user posting a followup. Leaving this
option at 0 which is the default value, will put the previous subject line
into the followup form and allow users to edit the subject however they
like. Setting this option to 1, however, will quote the subject, but simply
display it to the user, not allowing him or her to edit the subject line.
The third and final option can be achieved by setting the $subject_line
variable to 2. If it is set to 2, the subject will not be quoted and instead
the user will be prompted with an empty subject block in their followup
subject line.
$use_time = 1;
This option allows you to choose whether or not you want to use the hour:minute:second time with the day/month/year time on the main page. Day/Month/Year will automatically be placed on the main wwwboard.html page when a new entry is added, but if you leave this variable at 1, the hour:minute:second time will also be put there. This is very useful for message boards that get a lot of posts, but if you would like to save space on your main page, you can set this to 0, causing the hour:minute:second display not to be added.
Search will look at all your html pages for
words you enter, and return all pages on a list with links. This program
is completely configured and ready to run, but for Search.cgi to return
a response, it need to be activated. This is easily done by logging in via
telnet and at the prompt after login type the following command:
chmod +r /www/yourdomain
Now you can access search.cgi with the following
URL: http://yourdomain.com/cgi-bin/search.cgi.
There is a configuration file called search_define.pl
which accompanies search.cgi and sets up the variables for it. You can customize
which files you wish to exclude from searches, and also the cosmetics of
the search and results pages.
This is no longer installed by default. HTMLSCRIPT should be looked at as a alternative.
We still install it upon request, however it may have a few bugs making it difficult to browse through large records.
It is preferable to use mySQL for large databases. Various Perl and PHP scripts are available for mySQL.
The database is composed of 5 essential files:
database.cfg, database, post.html, search.html, and output.html. These are
located in the directory called "database" in your www directory.
They are already set up to run a simple database, but you can customize
them to meet your needs.
database.cfg
This is the configuration file for your database.
You need to make sure your Unix permissions are set to chmod 666 for this
file to work properly.
The first line is the location of the database,
which has the default value of our text database.
The second line is what page it should return
to after posting to database; the default value is to return to the post
page for another entry.
The third line is where you will start listing
any fields you want to have posted to the database. For example:
name
url
address
city
state
zip
You may have as many as you like listed for
these fields. These become your input fields and they must be associated
with the input statements on your post.html for each of the ones you want
to use. You should have a matching input statement that looks like the following
on your post.html page (note "name" and "address" are
for example and can be changed with whatever field you wish to use, also
the size attribute can be whatever you want):
<input=text name="name" size="25">
<input=text name="address" size=30">
database
This is nothing more than the actual data being
stored after it is posted from your post.html page.
post.html
This page is used to write to the database
from a webpage. You should have an input statement for each field used in
the database.cfg file. You may also use query boxes or radio buttons. The
method tag needs to remain the same as the one already on your server, but
the rest of it can be configured as you want.
If you want to activate the email feature,
add the following tag to your form:
<input type="hidden" name="email"
value="your email address">
When active, each time someone posts to the
database you will receive an email of the content.
search.html
This is the page that reads the actual database
file based on the criteria you would like to search. This can also be customized
to meet your requirements, in keeping with the fields you set up above.
output.html
You must make sure the Unix permissions are
set to chmod 666 for this file to work properly.
Each field you want printed in the output page
is enclosed in [brackets]. These may be laid out anywhere on the page --
this effectively becomes a printout template for your file. You may surround
these variables with as much normal text as you would like to have printed
with these records.
There should be a Single Page Shopping Cart
program installed on your server. You can see what it looks like by going
to this URL with your browser:
http://www.yourdomain.com/shop/boutique.html
If you want to customize the shopping cart,
(and you will if you want to sell products using this program), you can
visit:
http://virtualpublisher.com/host4u/index.html
The Virtual Publisher Shopping Cart program
is sophisticated and complex. Rather than reprint all their directions here,
please go to their website and download the help files associated with it.
If the Single Page Shopping Cart program wasn't installed on your server and you want it, please send us email and we'll make sure it's installed right away!
There are 3 different types of page counters
you can place on your pages. The first is a no-frills graphical counter
which looks like this:

To use this one, put the following tag somewhere
on your page, but change the yourpage.htm to be the address of the actual
page you are putting this counter on. Also, don't break up the tag like
we did. We had to do that to fit it on the page. The width=5
part refers to how many digits you want in your counter.
This counter is not as reliable as the others mentioned.
<IMG SRC="/cgi-bin/nph-count?width=5&link=domain/page.htm">
Another page counter you may want to use is
the Virtual Publisher Counter (on qualifying accounts only). It is another
graphical counter, but it will give you all kinds of stats such as time
and date of visits, and domains that your visitors come from. It looks like
this:

To put this counter on your page, insert the
following tag somewhere... please note that the line had to be broken up
to fit on this page, but the line should not be broken on your page.
<img src="/cgi-bin/counter/counter.cgi?fnam=testcount&viz=yes&
isinv=yes&setup=/home/www/yourdomain/cgi-bin/counter/setup.txt">
Where you see fram=testcount,
put in the name of the page you want to put the counter on instead of the
word testcount. The viz=yes
part tells the counter script whether your counter should be invisible or
not. If you want the counter to be visible, leave it as yes. If you want
it to be invisible, make it say viz=no.
The isinv=yes
part is for whether you want the counter to be inverted or not. The default
as below means that it is inverted (as shown in the graphic above). If you
wish for it to be just a black number against a white background, make it
say isinv=no.
Another great thing about this one is that
you can access the log files for each page you have the counter on, and
also reset the count to any number you wish. To see the instruction page,
go to http://yourdomain.com/counter/ with your web browser.
Please be aware that a count file will not
be created until a page is accessed for the first time.
Finally, the simplest kind of page counter
is a text-based counter. It uses SSI so the page you are putting it on must
have the .sht, .shtm, or .shtml extension. It will look like whatever text
and size attributes you give it on your page. The tag looks like this:
<!--#exec cgi="/cgi-yourdomain/counters/counter.cgi"-->
After you've put the counter on your page,
look at it with your browser. If you don't see the counter the first time,
hit reload. Then you should see the number 1. If you want to change the
page count, FTP to your site, and look in the counters directory in your
cgi-bin. There will be a file there with the name of whatever page you placed
this counter on. Just upload a new text file with a new number on it, and
that will be the new count on the page next time you hit reload. Remember
to upload the file in ASCII or text format.
Sample SSI:
<!--#exec cgi="/cgi-bin/count.cgi"-->
Please note as shown in the example above, the URL must be relative and
not a full call, this would not work
<!--#exec cgi="http://yourdomain.com/cgi-bin/count.cgi"-->
| © 2 0 0 1 S t o n e D e s i g n @ H o s t W o r k . c o m |